

How to Install a Golf Impact Screen
Learn how to install golf impact screen with expert tips on mounting, tensioning, and maintenance for a safe and immersive indoor golf simulator setup.
SIMULATORS
Golf Tech Buzz Editorial Team - Led by AJ “Buzz” Eichman
4/15/20267 min read
Setting up a golf impact screen is one of the smartest moves you can make if you’re serious about creating a functional indoor golf simulator. If you’re still piecing everything together, understanding how it all fits inside Golf Simulators helps avoid costly setup mistakes early. I’ve installed more than my share over the years—from spacious commercial rigs to cramped home garages—and what stands out is this: it’s not just about slapping up a screen. Getting it right means a proper, secure, and tensioned installation that holds up under full swings and heavy ball impact. Too many setups fail because folks underestimate how much force even an amateur golfer can generate indoors or they skip key prep steps that make or break the experience.
If you want your golf impact screen installation to last and truly deliver the immersive, safe simulator environment you’re after, this guide lays out everything you need. From tools, mounting options, tensioning tips, to common mistakes and safety considerations, I’m sharing what works in real-world installs—not what looks good on paper.
Quick Verdict
Use heavy-duty mounting hardware suited to your wall or frame type for safety and durability.
Achieve consistent screen tension—wrinkles or sagging kill image quality and sensor accuracy.
Plan your space to allow proper projector distance and ball flight without obstructions.
Regular inspection and maintenance of the mounting points and screen conditions extend lifespan.
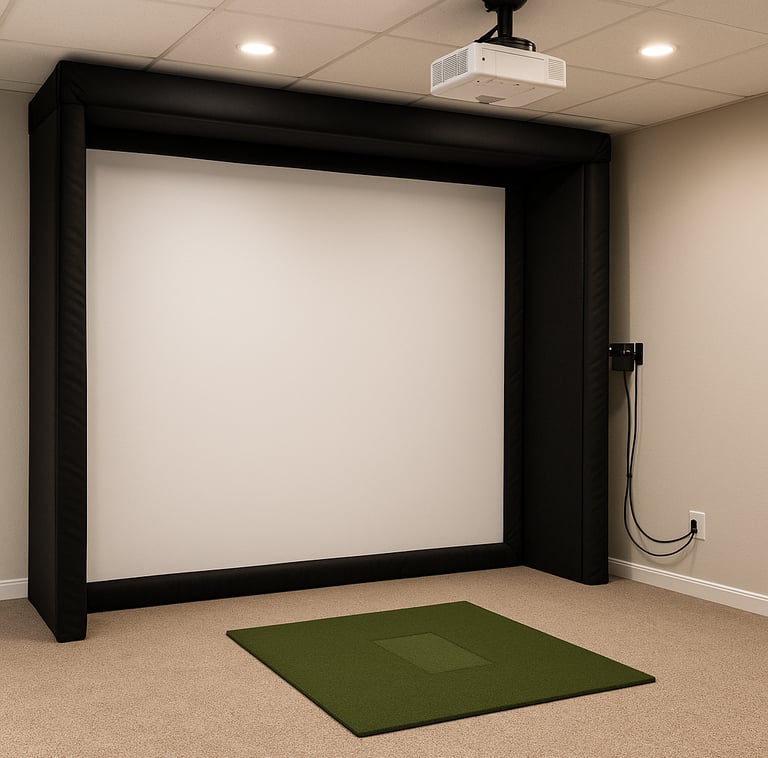
What Is a Golf Impact Screen and Why Is Proper Installation Crucial?
A golf impact screen is a specialized, durable fabric designed to safely catch golf balls during simulator play. If you want a deeper breakdown before installing, the Golf Impact Screens Guide covers how materials, layout, and performance all tie together. Unlike simple projector screens, these are built to withstand repeated high-speed impacts without tearing, all while providing a flat surface for sharp image projection and reliable ball tracking. ImpactTex and tightly woven polyester blends are common materials for this purpose.
What actually matters here is how the screen is installed. It needs to be stretched tight enough to avoid wrinkles but carefully fastened to absorb the repeated force from golf shots. A loosely hung screen will sag, distort the projected image, and confuse launch monitors or simulation software that track ball flight. On the flip side, overly tight tension with inadequate mounting can lead to hardware failure.
Proper golf impact screen installation ensures safety—preventing rebound injuries and damage to walls—and creates the immersive, accurate golf simulation experience that justifies the expense of your setup.
Tools and Materials Needed for Golf Impact Screen Installation
Before diving in, make sure you have the right gear on hand. If you're still deciding on gear quality, browsing through the Best Golf Impact Screens can help you match your materials to your installation expectations:
Tape measure and level (for accurate alignment)
Power drill with bits appropriate for your wall or framing material
Stud finder (to locate stable mount points)
Heavy-duty wall anchors, lag bolts, or mounting brackets suitable for your surface
Bungee cords, tension rods, or elastic cables designed for impact screen tensioning
Screwdriver set and wrench for hardware
Ladder or step stool for ceiling or high wall mounts
Protective gloves and safety glasses
Choosing the Right Mounting Option for Your Space
Not all spaces are created equal. The type of mount you choose depends heavily on your room’s dimensions, wall structure, and whether you want a permanent or semi-permanent setup.
Wall Mount
If your wall is strong and stable with exposed studs, direct wall mounting brackets provide a clean, rigid solution. This option maximizes floor space and usually provides excellent tension control. The downside is installation requires drilling into studs and potentially dealing with drywall anchors if studs don’t line up perfectly.
Ceiling Mount
For rooms with limited wall space or garage installs where the wall is not ideal for bearing weight, ceiling mounts can be a smart alternative. You can secure brackets into ceiling joists and suspend the impact screen. This keeps walls free for furniture but requires careful measurement to ensure projector alignment and hitting height.
Free-Standing Frame
If you want portability or your walls and ceiling won’t support heavier loads, a free-standing frame is the way to go. These can be made from metal piping or prefabricated kits. While they occupy more room, they allow easy relocation and don’t risk wall damage.
In most home installs, I recommend wall mounts if you have good studs, as they provide the sturdiest and most compact solution. Ceiling mounts come in second but need precise installation skills.
Step-by-Step Instructions to Install Your Golf Impact Screen
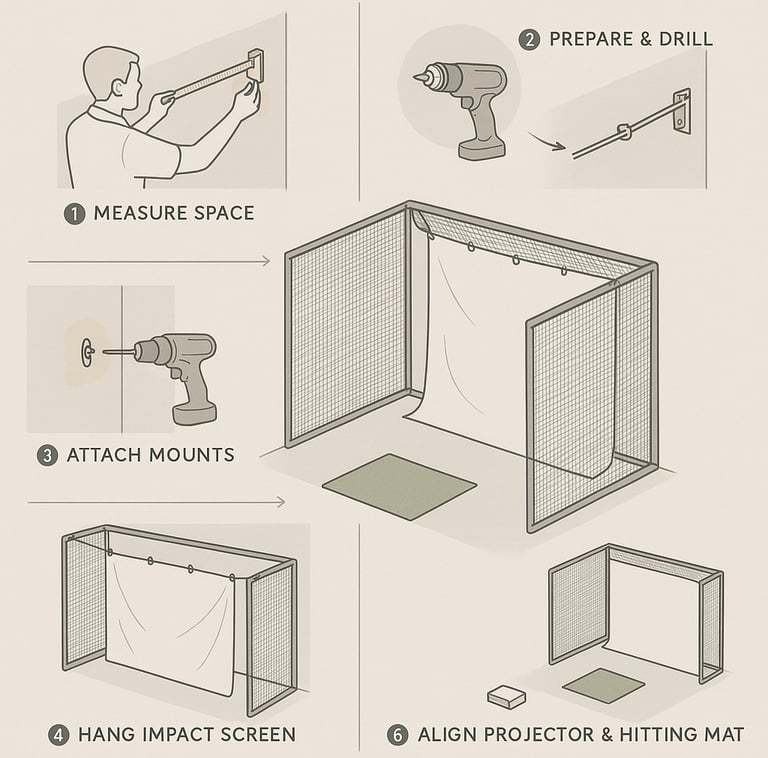
Measure Your Space
Plot out your room dimensions, hitting area, and screen placement. Allow for at least 10–15 feet distance from the projector to the screen for most home simulators. If you’re comparing full setups, something like Impact Screens vs Impact Screens With Enclosure can help you decide how much space and structure you actually need. Confirm wall or ceiling stud locations with a stud finder.Prepare Mounting Hardware
Select brackets or hooks rated for your screen weight and impact force. Pre-drill holes into studs or ceiling joists where you’ll install mounts.Attach Mounts to Surfaces
Secure your mounting hardware firmly. Use lag bolts for wood studs or heavy-duty anchors for masonry. Test mounts for stability before proceeding.Hang the Impact Screen
Attach the screen’s edges to the mounts using bungee cords, hooks, or tension rods. Begin loosely, then gradually apply tension. If you’re choosing materials, What Material Is Best for Impact Screens can help ensure your screen matches your setup demands.Tension the Screen
This step is critical. Use tensioning tools or elastic cords to achieve a taut surface with no wrinkles or sag. Work from center outwards, alternating sides to distribute tension evenly.Align the Projector and Hitting Area
Adjust your simulator projector so the image falls flat and fills the screen without distortion. Confirm hitting mat placement ensures balls strike the screen directly and safely.
Tips to Achieve Proper Screen Tension and Alignment
What I’ve learned over 25+ years is that tensioning makes or breaks your installation. A slack screen is the number one mistake I’ve seen that ruins simulator performance. If you don’t get the tension right:
Your projector image will warp over wrinkles.
The impact surface will flap on shots, throwing off ball data tracking.
The screen fabric lifespan shortens as it rubs and folds repeatedly.
For practical tensioning: bungee cords combined with tension rods provide elasticity that absorbs shock but maintains tautness. Avoid rigid hooks alone—they promote sagging. Also, confirm the screen is perfectly square from your vantage point before tightening fully.
On projector alignment, verify the throw distance matches your projector’s specs, usually 10-15 feet for home simulators. The screen should sit perpendicular to your hitting position to avoid skewed images or ball rebounds.
Common Installation Errors and How to Avoid Them
Insufficient screen tension: Causes sagging and image distortion; always use tensioning tools or quality elastic mounts.
Weak or wrong hardware: Using drywall anchors in place of studs or lightweight hooks leads to dangerous failures. Match anchor type to wall material.
Poor measurement: Not accounting for proper hitting distance and space behind the screen ends in restricted swings or damage to surrounding walls.
Ignoring projector-screen alignment: Misalignment ruins image clarity and tracking accuracy.
Overlooking safety: Loose cables, unstable mounts, or nearby furniture can cause accidents during play.
Safety Considerations During and After Installation
Safety is paramount when dealing with a high-impact setup indoors. Make sure all cables and cords are secured away from hitting zones. Use lock washers or thread-lock compounds on bolts to prevent loosening from vibration. Don’t mount too close to obstructions. It’s also smart to pad your frame or wall adjacent to the screen for rebound protection. In tighter setups, adding protection like discussed in Do You Need a Backing Net for Impact Screens can prevent damage and extend your system’s life.
Regularly inspect mounts, fasteners, screen fabric, and tensioning cords for wear and tighten or replace as needed. A properly maintained setup reduces injury risk and prolongs simulator life.
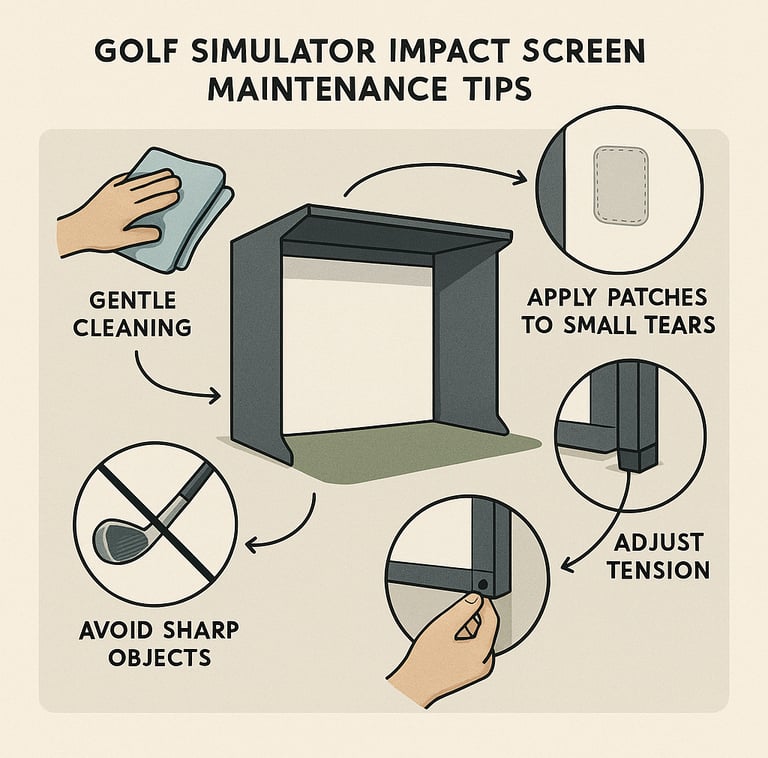
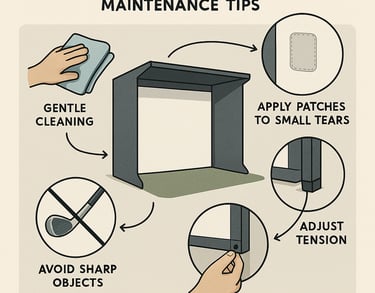
Maintaining and Inspecting Your Impact Screen for Longevity
Your impact screen is an investment. To keep it performing over time:
Clean the screen occasionally with a gentle detergent and soft cloth; avoid harsh chemicals.
Check tension monthly; elastic bungees and cords can stretch over time requiring retightening.
Inspect all mounting hardware every 6 months to catch any loosening or corrosion early.
Repair or replace screen fabric immediately if you notice tears or worn spots.
If you want to better understand long-term wear patterns, Impact Screen Durability Explained gives a solid breakdown of what to watch for.
With these simple steps, your golf impact screen will last for years, even with regular use.
Frequently Asked Questions
What tools are needed to install a golf impact screen?
You’ll need a tape measure, stud finder, power drill, screwdrivers, ladder, level, heavy-duty mounting hardware, and tensioning tools like bungee cords or tension rods.
Can I mount a golf impact screen on any type of wall?
Not all walls are equal. Solid wood studs or masonry are best. Drywall alone won’t support impact safely without reinforced backing or specialized anchors.
How tight should the impact screen be stretched during installation?
The screen should be taut with no wrinkles or sagging but not over-stretched to the point of risk to the mounting hardware. Use tensioning tools to distribute tension evenly.
What mounting options are best for limited space or garages?
Ceiling mounts work well for tight wall spaces, while free-standing frames offer portability but require more floor space.
How do I align the projector with the impact screen?
Position the projector at the recommended throw distance (usually 10-15 feet), and center it perpendicular to the screen. Test the image for focus and distortion before finalizing mounts.
How do I maintain and clean the impact screen?
Use a mild soap and water solution with a soft cloth. Avoid abrasive cleaners. Regularly check tension and hardware integrity.
Can I install the screen myself or should I hire a professional?
If you have basic handyman skills and proper tools, self-installation is feasible. For complex ceiling mounts or unusual walls, professional help is recommended to ensure safety and accuracy.
What safety precautions are recommended during and after installation?
Secure all cables, use rated hardware for weight and impact, pad nearby surfaces, and inspect hardware regularly to prevent accidents.
Conclusion
A properly installed golf impact screen is the cornerstone of a great indoor golf simulator. It’s not rocket science, but it does demand attention to detail and respect for the forces at play. Getting your mounting choices right, investing in quality hardware, and applying consistent tension will save headaches down the road. I’ve seen too many installs botched by cutting corners or ignoring real-world conditions, so take the time upfront to do it properly.
Follow this guide, anticipate your room’s unique needs, and maintain your setup regularly, and you’ll enjoy a durable, safe, and immersive simulator for years of enjoyable practice and play. That’s what actually works—trust me.
© 2026 GolfTechBuzz. All rights reserved.
Golf Tech Buzz
Performance Through Data
Practical guides, real-world setups, and unbiased comparisons for golfers building smarter practice environments.
General Inquiries: