

Where Should You Place a Launch Monitor in a Golf Simulator?
Master launch monitor placement in your golf simulator for reliable data on ball speed, spin, and launch angle. Set up right for a confident swing.
MONITORS
Golf Tech Buzz Editorial Team - Led by AJ “Buzz” Eichman
7/11/20267 min read
If you’ve ever tried to set up a golf simulator, you know it’s not just about having a nice screen and a mat to tee off on. One of the game changers—the heart of the whole rig—is the launch monitor. It’s the gadget that tells you if you’re crushing drives or slicing like it’s a sand wedge. But here’s the thing: where you place that launch monitor? It matters more than you might think. Get it wrong, and your data gets wonky. Put it in the right spot, and suddenly you’re getting numbers that actually help your game, not just confuse it.
Here’s the deal: launch monitor placement isn’t just some techy afterthought. It’s about setting your rig up to deliver real, usable golf data—the kind you can trust when tweaking your swing during those winter league nights or practice sessions. So, if you want bruiser data on ball speed, spin, launch angle, and direction, I’ve got you covered with the smart, no-BS guide you need.
To better understand the different technologies and simulator setups available today, check out our guide to Launch Monitors.
Quick Verdict on Launch Monitor Placement:
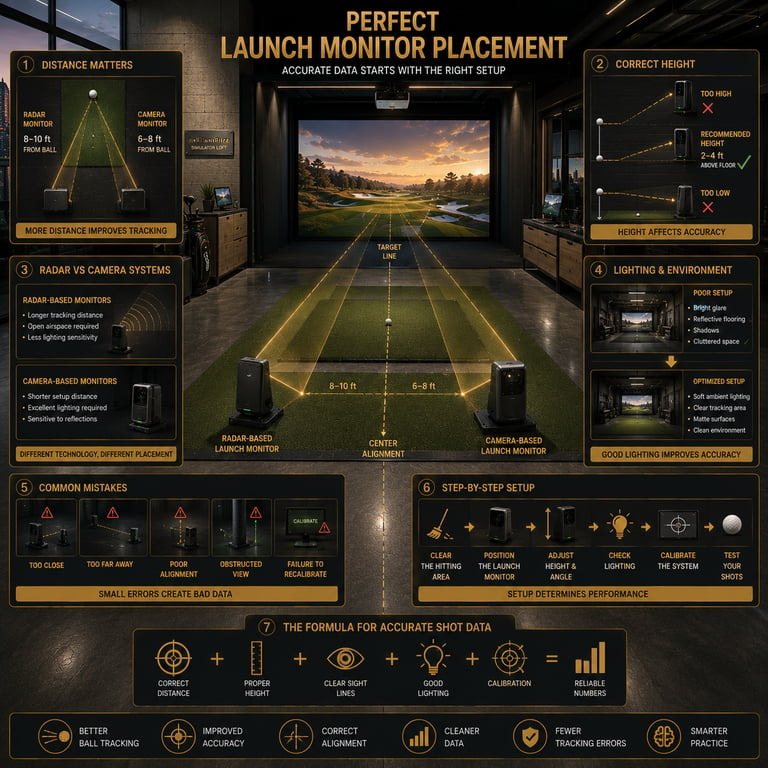
Position the launch monitor 6 to 10 feet directly in front of your hitting area for best tracking results.
Keep the device 2 to 4 feet off the ground—matching the ball flight path height is crucial.
Ensure a clear, unobstructed view with no walls, ceilings, or reflective surfaces in the way.
Factor in the type of monitor you have (radar versus camera) since each has different distance and lighting needs.
If you’re still shopping for a device, our picks for the Best Golf Launch Monitors are a great place to start.
How Does a Launch Monitor Work in a Golf Simulator?
Look, before we dive into where to put it, understand what this little beast does. Launch monitors use radar or high-speed cameras to measure your shot. Radar models send out radio waves that bounce off the ball and club, measuring speed, spin, and trajectory. Camera-based models, on the other hand, visually capture ball flight and club path using fast shutter speeds and image analysis.
Either way, the launch monitor needs a perfect angle and distance to “see” the ball and club with crystal clarity. Too close, and it misses important details; too far, and it loses track altogether. When properly placed, the launch monitor feeds your simulator accurate data that adjusts your on-screen flight and shot feedback in real-time.
Protecting those sensors matters just as much as placing them correctly, which is why many golfers invest in Best Golf Launch Monitor Protection Systems.
Key Placement Factors: Distance, Height, Angle
Here’s where I see some simulator setups trip up—launch monitor placement is all about geometry and line of sight.
Distance:
Most launch monitors need to be about 6 to 10 feet in front of the hitting mat. This is the sweet spot where the monitor can track the ball right off the tee or ground without blind spots. Radar systems usually prefer the longer end of this range because they need clear airspace in front. Camera-based systems sometimes require you to be closer, but always check your user manual because each model has its own specs.
Height:
You want the monitor sitting roughly between 2 to 4 feet high. That’s because it needs to catch the ball’s launch trajectory, which naturally starts a few inches off the ground. If it’s too low, the sensor might pick up ground interference. Too high, and it loses consistent focus on the ball and club path.
Angle:
Position it so the launch monitor’s lens or sensors face directly towards the ball, not skewed to the side or angled too far down. An off-kilter angle can mess with spin and direction readings. Most monitors have adjustable mounts allowing you to tweak the pitch for perfect alignment.
For more general advice on keeping expensive launch monitors safe, read Do You Need Protection for Your Golf Launch Monitor?
Environmental Considerations: Lighting and Background
I’ve seen guys ruin their setup by thinking lighting is optional. It’s not. Cameras need good, even lighting to pick up the ball and club clearly. Avoid harsh direct sunlight hitting your sensors or simulator screen. Reflective walls or floors behind the launch monitor can confuse the sensors, creating ghost images or data errors.
In a basement or garage, controlling artificial lighting is your friend. Use consistent ambient light, preferably soft and diffuse. Radar systems aren’t as sensitive to lighting but do need free space in front of the device, so no clutter or objects in the way.
If your simulator lives in a garage or tight indoor space, you’ll also want to review Best Ways to Protect a Golf Launch Monitor from Shanks and Mishits.
Differences Between Radar-Based and Camera-Based Launch Monitors
If you’re picking your launch monitor, you’ve probably run into the radar vs. camera debate. Here’s how placement plays into each:
Radar-based monitors:
Need a clear, unobstructed open space in front of the unit.
Usually sit a bit farther from the hitting area (towards 8-10 feet).
Less sensitive to lighting conditions but require open airspace—so no walls or netting too close in front.
Camera-based monitors:
Want to be closer to the hitting spot (6-8 feet is typical).
Require excellent and stable lighting conditions.
Are more affected by reflective backgrounds or changing light during the day.
Pick your launch monitor first, then fine-tune placement around its tech needs. Otherwise, you’re just guessing and hoping for the best.
Different launch monitor technologies often benefit from different types of protection, which we compare in Launch Monitor Case vs Protective Shield: Which Should You Buy?
Common Placement Mistakes to Avoid
I can’t stress this enough: I’ve seen guys mess up the simplest things and wonder why their numbers never add up.
Putting the launch monitor too close to the hitting mat, causing it to lose tracking once the club or ball moves past it.
Setting the device too high or too low, resulting in bad spin or launch angle data.
Obstructing the view with walls, ceilings, or random junk like bags and tripods.
Ignoring lighting—direct sunlight or shiny floors can wreck camera-based systems.
Forgetting to recalibrate after moving the launch monitor, leading to stale, inaccurate reads.
Golfers who regularly take their setup outside should also consider Can Golf Launch Monitors Be Used Outdoors Safely?
Step-by-Step Guide to Position Your Launch Monitor
Here’s how I do it when setting up a new simulator or retuning one:
Clear a straight line in front of your hitting mat—aim for about 8 feet of open space.
Place your launch monitor on a stable platform or adjustable mount at 3 feet off the ground.
Position the unit directly facing the ball’s expected flight path with the front sensors aligned squarely to that line.
Check that nothing obstructs the sensor view—this includes walls, poles, nets, or even your club bag.
Adjust lighting to be even; throw out bulbs or shades that cause glare or shadows near the monitor.
Run the calibration routine in your monitor's software, follow prompts to verify readings.
Take some test shots. The numbers should be consistent and match your on-course experience.
Calibration and Maintenance Tips for Accuracy
One last nugget—don’t think placement is a “set it and forget it” deal. Every time you move the launch monitor or modify your simulator enclosure, recalibrate. Updates to the monitor’s firmware or software can also alter tracking, so keep everything up to date. Trust me, you want fresh, clean data every round—not some wonky ghost of last season’s swing.
Screen-equipped launch monitors may also benefit from additional protection, as discussed in Are Launch Monitor Screen Protectors Worth It?
Tailoring Placement to Your Simulator Space and Use Case
Space constraints differ wildly. Setting up a home simulator in a packed garage? You might only get 6 feet of forward space, so choose a launch monitor designed for shorter distances. Got a pro indoor studio with plenty of room? Optimize for maximum sensor distance and stability. Portable setups? Consistent calibration and quick assembly are key.
Remember, it’s about matching your device to your room’s realities. Don’t scrimp on placement because you want to save space—accuracy is king.
FAQ
What is the ideal distance to place a launch monitor in a golf simulator?
Most experts recommend positioning the launch monitor 6 to 10 feet in front of the hitting area depending on whether it’s camera or radar based.
Should the launch monitor be set at ball height or higher?
Aim for about 2 to 4 feet high, roughly matching the ball flight path. Too low risks ground interference; too high can lose focus on the launch event.
How do lighting conditions affect launch monitor accuracy?
Camera-based systems require consistent, even lighting with minimal glare or reflections. Radar systems are less sensitive but still need open space free of obstructions.
Can I use the same placement setup for radar-based and camera-based launch monitors?
No. Radar models generally need more distance and open space, while camera-based devices prefer closer, well-lit environments.
What are common positioning mistakes for launch monitors?
Too close or too far placement, poor height alignment, obstructed view of sensors, and ignoring lighting challenges are the usual culprits.
Do I need to recalibrate the launch monitor if I move it?
Absolutely. Recalibration ensures the monitor correctly interprets ball and club data from the new placement.
How much space do I need to set up a launch monitor indoors?
Plan for at least 6 to 10 feet in front of the hitting area, plus height clearance of 8 to 10 feet, depending on your launch monitor’s specs.
Are there differences in launch monitor placement for home versus commercial simulators?
Yes. Commercial setups often have more space and lighting controls, allowing optimal placement. Home simulators might require compromises but should still follow best practices for data accuracy.
Conclusion
Alright, here’s the bottom line: your launch monitor is only as good as how well you place it. Screw that up, and you’re just gambling with your swing numbers. Nail it, and your simulator setup turns into a precision tool that will sharpen your skills down to a +3 handicap or better.
So take the time. Clear the space, dial in that height and distance, control your lighting, and keep things calibrated. Your future self—smoking a cigar after sinking a perfect simulator birdie—will thank you. After all, we all want gear that works, not gear that just looks good on paper. Now, go set up your launch monitor like a pro and swing with confidence.
© 2026 GolfTechBuzz. All rights reserved.
Golf Tech Buzz
Performance Through Data
Practical guides, real-world setups, and unbiased comparisons for golfers building smarter practice environments.
General Inquiries: